I’m not even going to sugarcoat it, this is by far one of the best recipes I’ve ever created in my entire life! I don’t have an intro for this, nor do I have a story to share. I don’t even remember the macronutrients for this recipe as I completely forgot to calculate them (I was too busy eating).
I hope you enjoy!
Estimated Time (Excluding Marination):
30 – 45 minutes for 3 fried chicken cutlets
Ingredients:
Buttermilk Brine:
- 2 medium sized cuts of Chicken (It can be breast, thigh, or drumstick. I personally did breast, but I would’ve done thigh if I had it)
- 2 cups Buttermilk
- 2 tbsp Kosher Salt
- 1 tbsp garlic powder
- 1 tbsp onion powder
- 1 tbsp ground white pepper
- 1 tbsp Korean Chili Flakes (Gochugaru)
- 1 tbsp ground ginger
- 1 tsp smoked paprika
- 2 tsp Old Bay (optional)
- 1 tsp turmeric
- 1 tbsp soy sauce
- 1 tsp Chicken Bouillon (optional)
- 2-3 tsp MSG
Batter:
- 2 cups All-purpose flour
- 1 /2 cup cornstarch
- 2 tbsp potato starch
- 1 tbsp rice flour (optional, but recommended)
- 1 tbsp baking powder
- 1 tsp salt
- 1 tsp garlic powder
- 1 tsp onion powder
- 1 tbsp Korean Chili Flakes
- 1 tsp MSG
Korean BBQ Sauce
- 1/3 or 1/2 cup BBQ Sauce (Sweet Baby Rays is the best)
- 1/4 cup Soy Sauce
- 2 tbsp Korean Chili Paste (gochujang)
- 1/4 cup honey
- 1/4 cup brown sugar
- 2 tbsp rice vinegar
- 2 tbsp sesame oil
- 2 tbsp minced ginger
- 1 tbsp minced garlic
- 1 tbsp mirin
- 2 tbsp Korean Chili Flakes
- 2 tbsp apple cider vinegar (or 1 tbsp of lemon juice)
- Green Onions (garnish)
- Toasted Sesame Seeds (garnish)
Tips:
- 12 hours MINIMUM for the buttermilk brine! There is no compromise.
- Primarily for the sauce, I would add the chili paste in slow batches rather than all in one if I were you.
Steps:
Chicken Brine
- Step 1: Whisk all the ingredients (excluding the chicken) together in a large bowl.
- Step 2: Add your chicken pieces until they’re fully submerged. Leave it in the refrigerator for 12 – 24 hours.
Batter and Frying
- Step 1: In a bowl, mix in all of the batter ingredients together.
- Step 2: Take your chicken out of the brine and pat it dry. Excess moisture will cause soggy chicken. Don’t toss out your brine just yet though.
- Step 3: This will be a combination of both your brine, and your dry ingredients.
- First, dredge the chicken in the flour mixture, then dip it back into the butter milk (just a quick dip), and then coat it a second time with the flour mix.
- Step 4: Heat the oil to 350°F. If the oil is too hot, the outside will burn before the inside; too cool and the chicken will be greasy.
- Step 5: Fry the chicken in batches to avoid overcrowding. If you don’t have a fryer basket (like myself), make sure to flip the chicken on its other side half way through to ensure even heat distribution.
- Step 6: Let the chicken rest on a cool wire rack for 3-5 minutes. Then, heat your oil to 400°F and fry again for around 1-2 minutes or until desired crispiness.
- Step 7: Take the chicken out and let it rest on the wire rack again until the skin hardens. If you’re too quick and didn’t let the chicken properly rest, the skin will fall off in the sauce.
Korean BBQ Sauce
- Step 1: In a saucepan, combine all of the ingredients except the garnish, and 1 tbsp of Korean chili paste.
- Step 2: Simmer over medium heat for about 10-15 minutes and stir occasionally. You want it to thicken and develop a rich, glossy texture.
- Step 3: Once thickened, taste and adjust. Add in more honey for sweetness, more apple cider for tang, and/or chili paste for heat
- Step 4: Remove from heat and let it cool to room temperature.
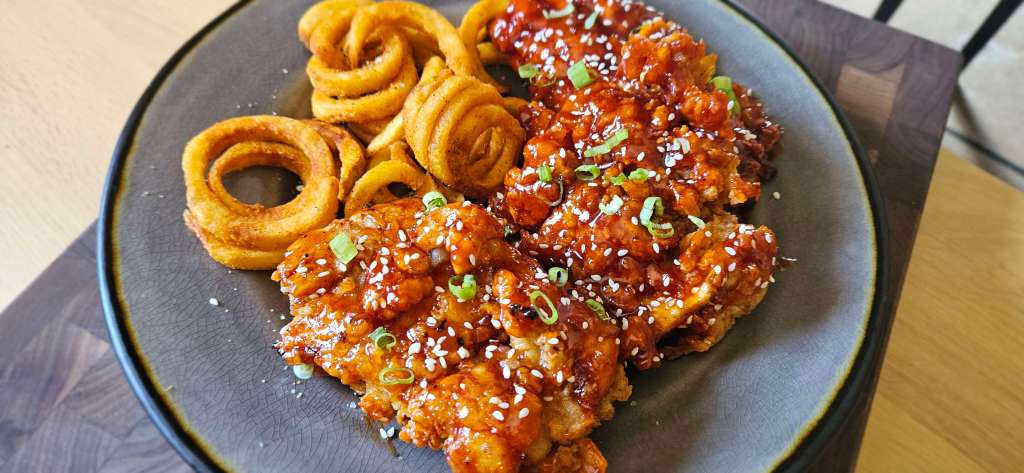
- Step 5: Brush the sauce on the chicken, or put it in a bowl and toss it with the chicken to coat it evenly. Sprinkle with toasted sesame seeds and a few chopped green onions for a final garnish.
